Render Targets for Shaders without the Render Target Camera Overhead
Hello everyone!
Today, I'll be writing on how you can create a render target texture, that can be used for anything from water ripples to snow trails to grass interaction without the GPU overhead of adding a render target camera to your scene. This solution is incredibly cheap on both the CPU and GPU and allows you to bake in even more information than you could get from using a render target camera.
This solution has limitations, however, unless you require everything in your scene to interact with your world, you won't be impacted by the limitations but instead will gain more possibilities as you will be able to bake in custom data such as normals. Since you need to explicitely track what you want to paint, it would be impossible to track everything in the world performantly. But if you're just looking for characters, enemy, specific object interactions this is a great solution.
To create this you will first need to create a simple manager that keeps tracks of all actors, or components, whatever you want to interact with your scene. This manager can be a UWorldSubsystem, a UComponent on your AGameState, or an AActor in your world. I prefer to use a UWorldSubsystem as this is the cleanest way to keep a state specific to your world.
The only things this class will need to be able to do is;
- Add relevant actors/components to an array
- Remove actors/components from said array
- Determining the center point
- Tick
Some other information this class needs in order to work;
- A pointer to a UTextureRenderTarget2D
- A second pointer to a UTextureRenderTarget2D
- A world size FVector2D
This is used to determine the size around your camera, or center point, that is relevant to the render target. - A pointer to a UMaterialInstanceDynamic the render target
- (Optionally) a pointer to a UMaterialInterface
- A UMaterialParameterCollection
Here's a header I created that contains all of the above if you don't want to type it our yourself.
UCLASS(BlueprintType)
class UWorldInteractionSubsystem : public UTickableWorldSubsystem
{
	GENERATED_BODY()

public:
	UFUNCTION(BlueprintCallable)
	void RegisterActor(AActor* ActorToRegister);

	UFUNCTION(BlueprintCallable)
	void UnregisterActor(AActor* ActorToUnregister);

	UFUNCTION(BlueprintCallable)
	void SetCenterCamera(UCameraComponent* CenterCamera);

protected:
	// UTickableWorldSubsystem
	virtual void Tick(float DeltaTime) override;
	virtual TStatId GetStatId() const override;
	// ~UTickableWorldSubsystem

private:
	UPROPERTY(Transient)
	UTextureRenderTarget2D* RenderTarget;

	UPROPERTY(Transient)
	UTextureRenderTarget2D* RenderTargetMemory;

	UPROPERTY(Transient)
	UMaterialInstanceDynamic* RenderTargetMemoryMaterial;

	UPROPERTY(Transient)
	UMaterialInterface* DrawMaterial;

	UPROPERTY(Transient)
	UMaterialParameterCollection* ParameterCollection;

	UPROPERTY(Transient)
	FVector2D PaintArea = FVector2D(2048.f);

	UPROPERTY(Transient)
	UCameraComponent* CameraComponent;

	UPROPERTY(Transient)
	TArray<AActor*> RelevantActors;
};
The .cpp file would look like this
void UWorldInteractionSubsystem::RegisterActor(AActor* ActorToRegister)
{
	if (ensure(IsValid(ActorToRegister)))
	{
		RelevantActors.Add(ActorToRegister);
	}
}

void UWorldInteractionSubsystem::UnregisterActor(AActor* ActorToUnregister)
{
	RelevantActors.Remove(ActorToUnregister);
}

void UWorldInteractionSubsystem::SetCenterCamera(UCameraComponent* CenterCamera)
{
	if (ensure(IsValid(CenterCamera)))
	{
		CameraComponent = CenterCamera;
	}
}

void UWorldInteractionSubsystem::Tick(float DeltaTime)
{
	// Tick logic
}

TStatId UWorldInteractionSubsystem::GetStatId() const
{
	return GetStatID();
}
Now that we have the base of our subsystem ready we can start adding logic to it but before we do that let's explain why we need 2 materials and 2 render targets.
- RenderTarget (Current)
This is what is currently painted on your current frame and does not hold any information from any previous frames. - RenderTargetMemory (Memory)
This is your render target that contains the past few frames' information - RenderTargetMemoryMaterial
This is what paints your current frame render target onto your memory render target. Used to offset the memory render target and fade out the old frames. - DrawMaterial
This is what you actually paint per character onto the render target. This can be anything you want, but typically a white sphere or gradient. This is optional as you can also just paint with the paint functions provided by the engine, but materials give more control.
There are some changes you can make, should you require that, such as;
- You can use an actor rather than the camera to specify a center location, the center location is just what you want to be the center of everything painted, which typically is the camera but it can be anywhere you want.
With that explained let's start implementing the logic. The logic has a few components to it, namely;
- Determining if the registered actor is relevant for the render target
- Calculating local location of actor location in respect to the camera
- Calculating the scaled local location in respect to the paint area and the texture size
- Painting the locations onto the current render target
- Painting the current render target onto the memory render target
Start by preparing your tick function:
	// It's a good idea to track performance of this function should you ever need to optimize it
	QUICK_SCOPE_CYCLE_COUNTER(STAT_PaintWorldInteraction);

    // Check for validity, remove the last two IsValids until you get to the memory render target.
	if (!IsValid(CameraComponent) || !IsValid(RenderTarget) || !IsValid(RenderTargetMemory) || !IsValid(ParameterCollection))
	{
		return;
	}

	// Grab the location of the camera
	const FVector2D centerLocation(CameraComponent->GetComponentLocation());

	// Divide the paint area by 2 to get half of its size (you can cache this for extra performance)
	const FVector2D halfPaintArea = PaintArea * .5;

	// Calculate the size in units per pixel of the render target, in this case we're using a square so I can safely use X.
	// If you don't use a square you'll want to change this part of the code.
	const float areaPixelSize = (PaintArea / RenderTarget->SizeX).X;

	// Calculate a relative scale so we can just scale a world size to a paint size
	const float invertedAreaPixelSize = 1.f / FMath::Max(1.f,areaPixelSize);

	// Calculate half the size of the render target (you can cache this for extra performance)
	const FVector2D halfFrameSize = FVector2D(RenderTarget->SizeX * .5f, RenderTarget->SizeY * .5f);

    // Setup the paint box
	const FBox2D paintBox = FBox2D(-halfPaintArea, halfPaintArea);

	// Prepare to draw
	UCanvas* canvas;
	FVector2D canvasSize;
	FDrawToRenderTargetContext context;
	// Reset the current render target
	UKismetRenderingLibrary::ClearRenderTarget2D(this, RenderTarget);
	// Start drawing a new one
	UKismetRenderingLibrary::BeginDrawCanvasToRenderTarget(this, RenderTarget, canvas, canvasSize, context);
Now that we have the basic information setup we can start iterating over our registered actors and finally start drawing
// Start iterating the relevant actors
// Iterate backwards because we can remove actors during the loop
	for (int32 i = RelevantActors.Num() -1 ; i >= 0; --i)
	{
		// Check if the actor is still relevant. You should keep track of the lifecycle of actors you register but this is a good failsafe to prevent crashing
		AActor* actor = RelevantActors[i];
		if (!ensureAlways(IsValid(actor)))
		{
			RelevantActors.Remove(actor);
			continue;
		}

		// If the actor is hidden we don't want to show it (but you can change that for example if you want a ghost to interact with the scene)
		if (actor->IsHidden()) continue;

		// Grab the world location of the actor
		const FVector2D actorWorldLocation(actor->GetActorLocation());

		// Get the delta between camera center and actor
		const FVector2D delta = actorWorldLocation - centerLocation;

		// Out of bounds? Ignore
		if (!paintBox.IsInside(delta)) continue;

		// Calculate paint position from the delta
		const FVector2D paintPosition = halfFrameSize + delta * invertedAreaPixelSize;

		// Get the bounds of the actor
		// If you're using a character it's probably a good idea to use capsule width
		FVector origin, bounds;
		actor->GetActorBounds(true, origin, bounds);

		// Calculate the paint size required to cover the bounds of the actor
		const FVector2D paintBounds = FVector2D(bounds) * invertedAreaPixelSize;

		// Draw your material to the current render target
		canvas->K2_DrawMaterial(DrawMaterial, paintPosition, paintBounds, FVector2D(.5f), FVector2D(.5f));
	}

UKismetRenderingLibrary::EndDrawCanvasToRenderTarget(this, context);Now you need to create a simple material that is rendered (DrawMaterial), in my case this is just a SphereGradient.
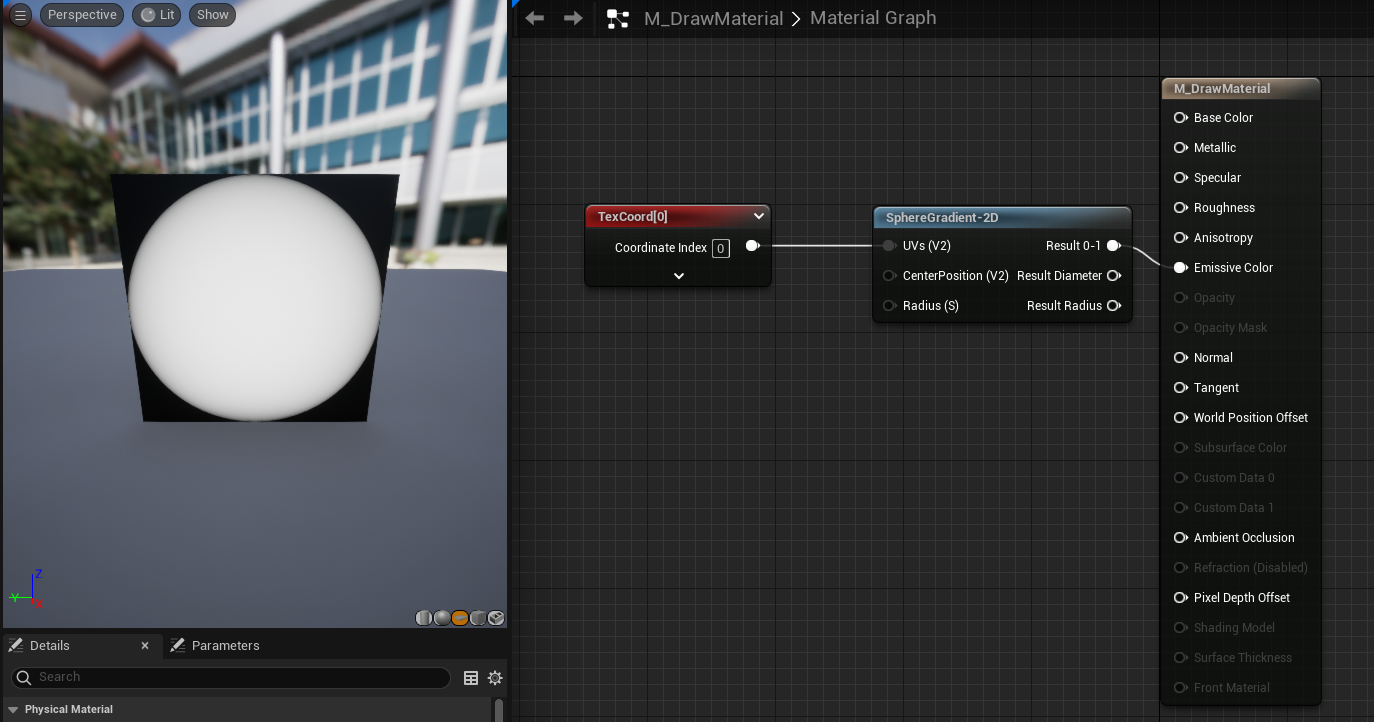
Now we need to add a function to setup the parameters:
UFUNCTION(BlueprintCallable)
void Setup(UTextureRenderTarget2D* InRenderTarget, UTextureRenderTarget2D* InRenderTargetMemory, UMaterialInterface* InDrawRenderTargetMemoryMaterial, UMaterialInterface* InDrawMaterial, UMaterialParameterCollection* InParameterCollection);
void UWorldInteractionSubsystem::Setup(UTextureRenderTarget2D* InRenderTarget, UTextureRenderTarget2D* InRenderTargetMemory, UMaterialInterface* InDrawRenderTargetMemoryMaterial, UMaterialInterface* InDrawMaterial, UMaterialParameterCollection* InParameterCollection)
{
RenderTarget = InRenderTarget;
RenderTargetMemory = InRenderTargetMemory;
RenderTargetMemoryMaterial = UMaterialInstanceDynamic::Create(InDrawRenderTargetMemoryMaterial, this);
DrawMaterial = InDrawMaterial;
ParameterCollection = InParameterCollection;
}Once we have this ready, you should be able to run the code and see the current render target update with the registered actors if you move your camera around. Below is a gif of that, my settings were;
- Paint area of {2048,2048}
This doesn't have to be power of two, but I like power of two numbers - Render target size of 2048x2048
This also doens't have to be power of two, but since it's a texture it's probably better. They also don't have to be that big, 512 would be just fine, but for demo purposes I used something higher. - Simple sphere actors in the world with various sizes
Now that we have this you can see we're drawing sphere the size of the spheres onto our render target. But that only shows current frame information and you can hardly create nice effects based on that.
So let's add past frames information to it!
Let's start by keeping track of the center location from last frame. Add a new FVector2D to the header and set the last camera location at the end of the tick function.
UPROPERTY(Transient)
FVector2D LastCameraLocation;
And at the very bottom of the Tick function:
LastCameraLocation = centerLocation;Now, between the above and our last EndDrawCanvasToRenderTarget let's paint past frames. Calculate the offset of the camera between last and current frame and set it as an offset in the RenderTargetMemoryMaterial. Also set the paint area size as a scalar parameter. Then draw the material to the memory render target.
static const FName OffsetName = "Offset";
static const FName SizeName = "Size";
static const FName LocationName = "Location";

// Calculate our offset
const FVector2D offset = LastCameraLocation - centerLocation;

// Set the offset and size onto the render target material
RenderTargetMemoryMaterial->SetVectorParameterValue(OffsetName, FVector(offset.X, offset.Y, 0.f));
RenderTargetMemoryMaterial->SetScalarParameterValue(SizeName, PaintArea.X);

// Set parameter collection values for use in your foliage, water, snow, etc.
UKismetMaterialLibrary::SetVectorParameterValue(this, ParameterCollection, LocationName, FLinearColor(centerLocation.X, centerLocation.Y, 0.f));
UKismetMaterialLibrary::SetScalarParameterValue(this, ParameterCollection, SizeName, PaintArea.X);

UKismetRenderingLibrary::DrawMaterialToRenderTarget(this, RenderTargetMemory, RenderTargetMemoryMaterial);
Now we need to create the material that actually renders the past frames.
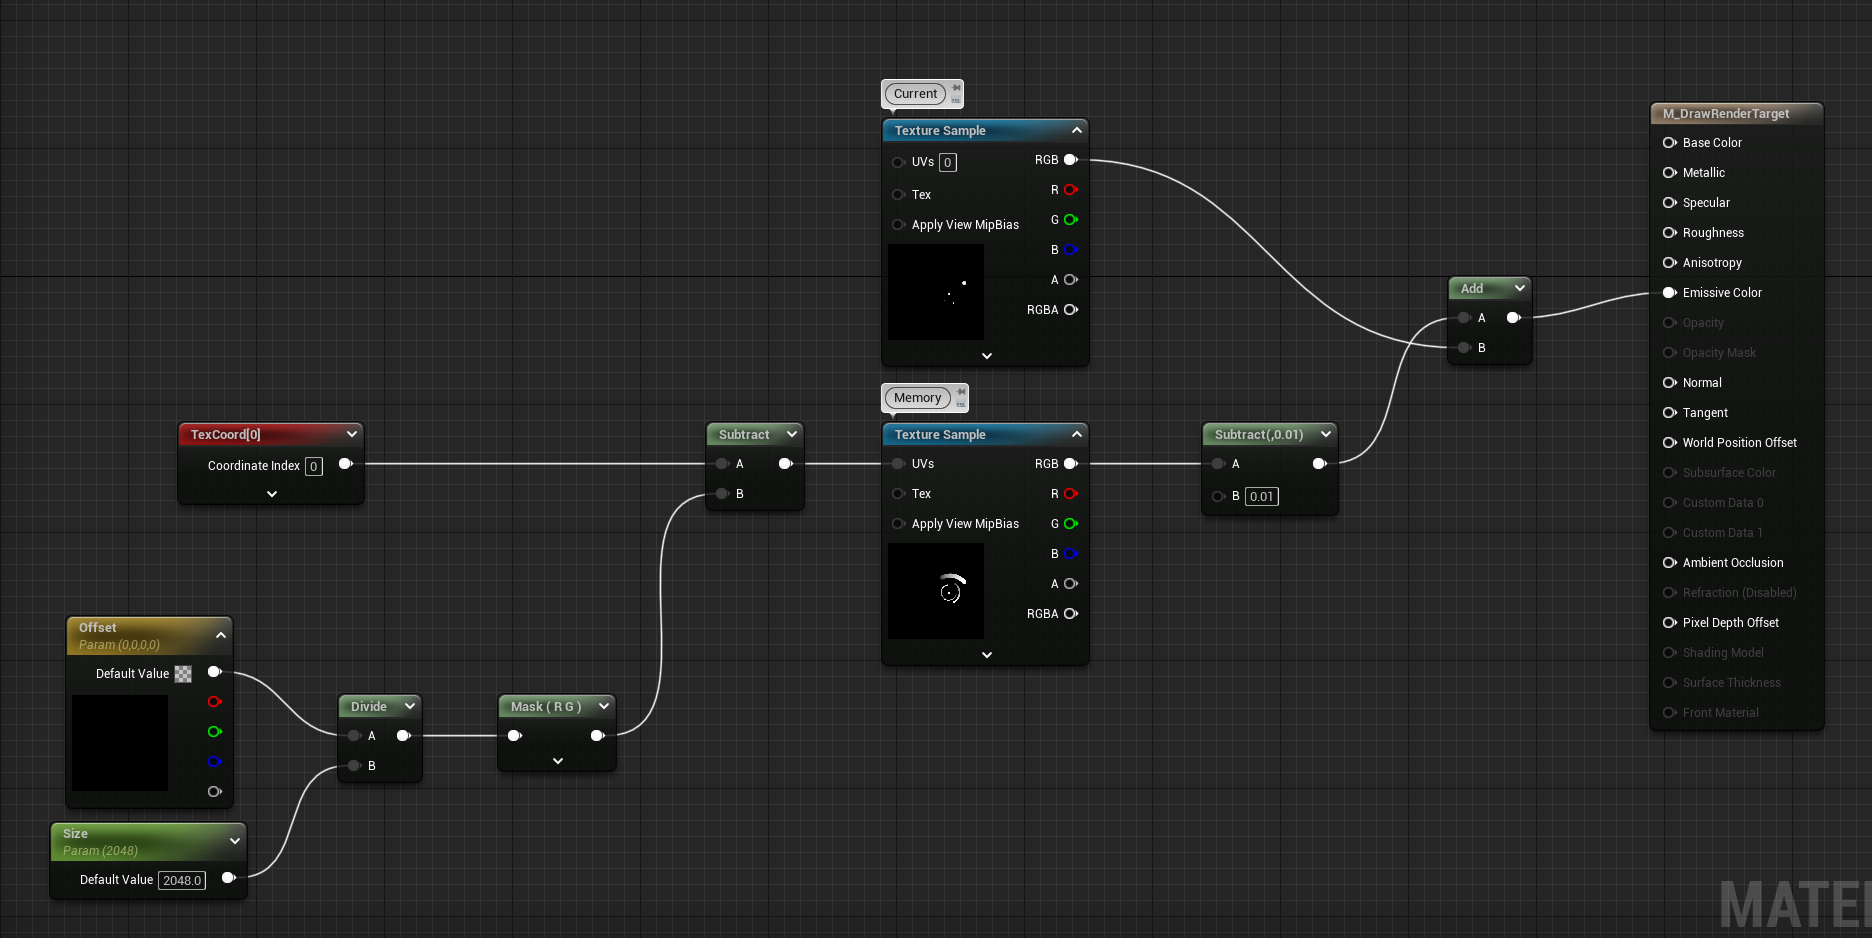
I did end up doing something wrong in the math and my result looked, let's say, incorrect.
Once I fixed the math it did look proper :)
Now, because the spheres aren't moving you're not actually seeing anything interact, so let's move the spheres and see what it does!
But this might be hard to see, so let's add some color on the trails to show it's actually trailing on the grass! :)
Now the fun part can begin, creating your interactions! Now, I am not a shader artist and I have little knowledge on how to make nice swirly interactions so I won't be providing a material to do so, however I will provide the minimum you need in order to get the data out of the memory render target.
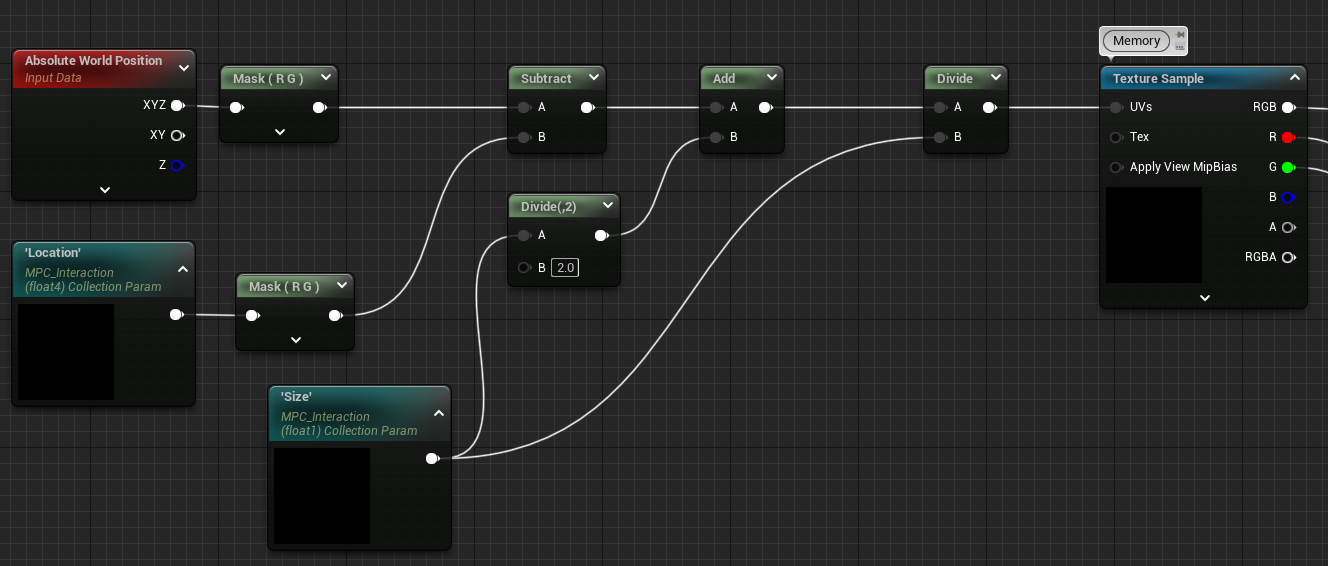
Above material projects the memory render target onto your shader's world position by using the paint area size and center location of the render target.
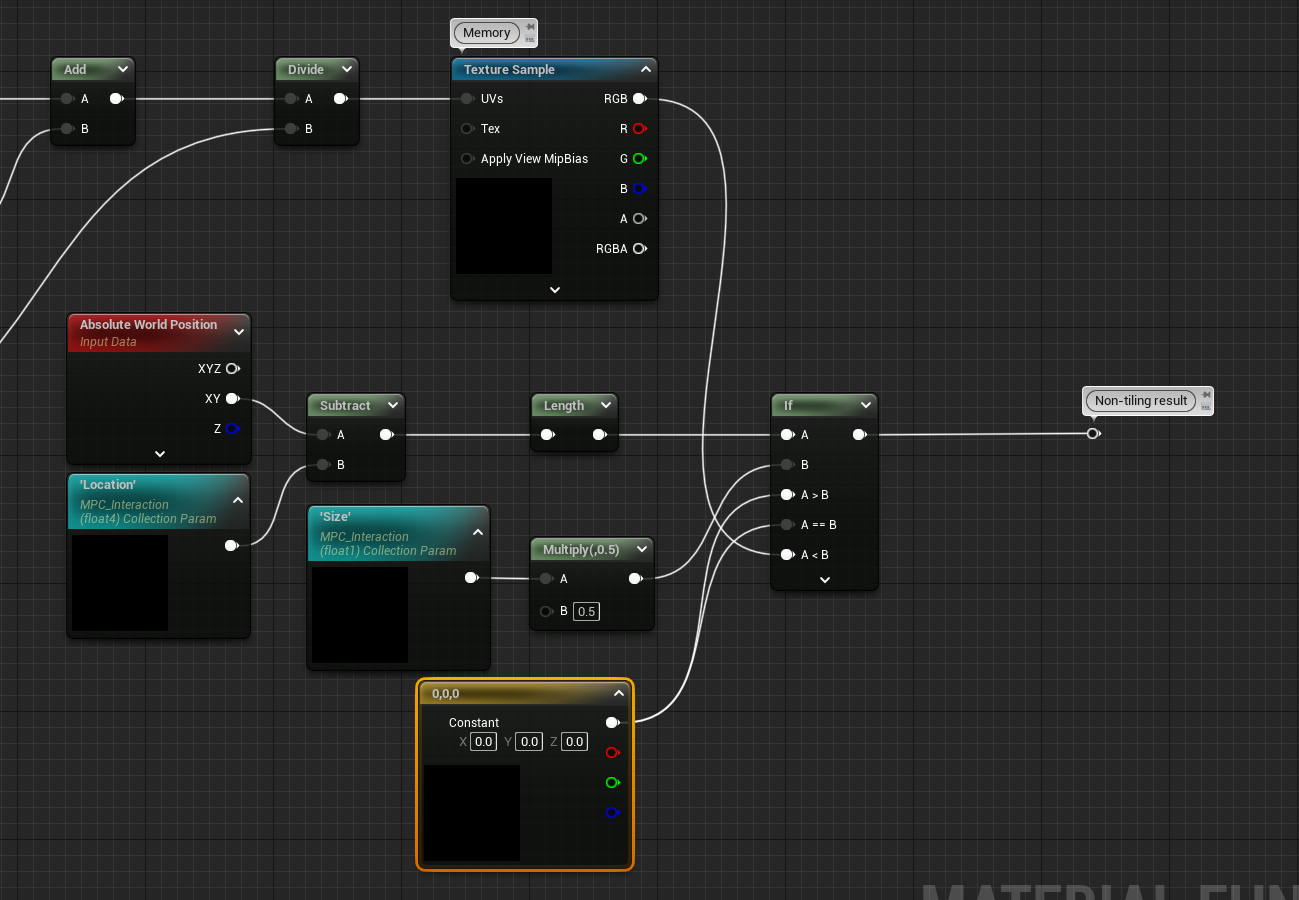
There's an addition you want to do after you projected the render target onto your shader.
Now you should be ready and set to start interacting with your world, without the overhead of an additional camera on your GPU.
I hope you enjoyed this and should you have questions you can reach out on my twitter.
TLDR; All code
UCLASS(BlueprintType)
class UWorldInteractionSubsystem : public UWorldSubsystem, public FTickableGameObject
{
	GENERATED_BODY()

public:
	UWorldInteractionSubsystem();

	UFUNCTION(BlueprintCallable)
	void Setup(UTextureRenderTarget2D* InRenderTarget, UTextureRenderTarget2D* InRenderTargetMemory, UMaterialInterface* InDrawRenderTargetMemoryMaterial, UMaterialInterface* InDrawMaterial, UMaterialParameterCollection* InParameterCollection);

	UFUNCTION(BlueprintCallable)
	void RegisterActor(AActor* ActorToRegister);

	UFUNCTION(BlueprintCallable)
	void UnregisterActor(AActor* ActorToUnregister);

	UFUNCTION(BlueprintCallable)
	void SetCenterCamera(UCameraComponent* CenterCamera);

protected:
	// FTickableGameObjectInterface
	virtual void Tick(float DeltaTime) override;
	virtual TStatId GetStatId() const override;
	virtual bool IsAllowedToTick() const override;
	// ~FTickableGameObjectInterface

protected:
	UPROPERTY(EditDefaultsOnly)
	UTextureRenderTarget2D* RenderTarget;

	UPROPERTY(EditDefaultsOnly)
	UTextureRenderTarget2D* RenderTargetMemory;

	UPROPERTY(EditDefaultsOnly)
	UMaterialInstanceDynamic* RenderTargetMemoryMaterial;

	UPROPERTY(EditDefaultsOnly)
	UMaterialInterface* DrawMaterial;

	UPROPERTY(EditDefaultsOnly)
	UMaterialParameterCollection* ParameterCollection;

	UPROPERTY(EditDefaultsOnly, BlueprintReadOnly)
	FVector2D PaintArea = FVector2D(4096.f);

private:
	UPROPERTY(Transient)
	UCameraComponent* CameraComponent;

	UPROPERTY(Transient)
	TArray<AActor*> RelevantActors;

	UPROPERTY(Transient)
	FVector2D LastCameraLocation;
};
void UWorldInteractionSubsystem::Setup(UTextureRenderTarget2D* InRenderTarget, UTextureRenderTarget2D* InRenderTargetMemory, UMaterialInterface* InDrawRenderTargetMemoryMaterial, UMaterialInterface* InDrawMaterial, UMaterialParameterCollection* InParameterCollection)
{
RenderTarget = InRenderTarget;
RenderTargetMemory = InRenderTargetMemory;
RenderTargetMemoryMaterial = UMaterialInstanceDynamic::Create(InDrawRenderTargetMemoryMaterial, this);
DrawMaterial = InDrawMaterial;
ParameterCollection = InParameterCollection;
}
void UWorldInteractionSubsystem::RegisterActor(AActor* ActorToRegister)
{
if (ensure(IsValid(ActorToRegister)))
{
RelevantActors.Add(ActorToRegister);
}
}
void UWorldInteractionSubsystem::UnregisterActor(AActor* ActorToUnregister)
{
RelevantActors.Remove(ActorToUnregister);
}
void UWorldInteractionSubsystem::SetCenterCamera(UCameraComponent* CenterCamera)
{
if (ensure(IsValid(CenterCamera)))
{
CameraComponent = CenterCamera;
}
}
void UWorldInteractionSubsystem::Tick(float DeltaTime)
{
// It's a good idea to track performance of this function should you ever need to optimize it
QUICK_SCOPE_CYCLE_COUNTER(STAT_PaintWorldInteraction);
if (!IsValid(CameraComponent) || !IsValid(RenderTarget) || !IsValid(RenderTargetMemory) || !IsValid(ParameterCollection))
{
return;
}
// Grab the location of the camera
const FVector2D centerLocation(CameraComponent->GetComponentLocation());
// Divide the paint area by 2 to get half of its size (you can cache this for extra performance)
const FVector2D halfPaintArea = PaintArea * .5;
// Calculate the size in units per pixel of the render target, in this case we're using a square so I can safely use X.
// If you don't use a square you'll want to change this part of the code.
const float areaPixelSize = (PaintArea / RenderTarget->SizeX).X;
// Calculate a relative scale so we can just scale a world size to a paint size
const float invertedAreaPixelSize = 1.f / FMath::Max(1.f,areaPixelSize);
// Calculate half the size of the render target (you can cache this for extra performance)
const FVector2D halfFrameSize = FVector2D(RenderTarget->SizeX * .5f, RenderTarget->SizeY * .5f);
// Setup the paint box
const FBox2D paintBox = FBox2D(-halfPaintArea, halfPaintArea);
// Prepare to draw
UCanvas* canvas;
FVector2D canvasSize;
FDrawToRenderTargetContext context;
// Reset the current render target
UKismetRenderingLibrary::ClearRenderTarget2D(this, RenderTarget);
// Start drawing a new one
UKismetRenderingLibrary::BeginDrawCanvasToRenderTarget(this, RenderTarget, canvas, canvasSize, context);
// Start iterating the relevant actors
// Iterate backwards because we can remove actors during the loop
for (int32 i = RelevantActors.Num() -1 ; i >= 0; --i)
{
// Check if the actor is still relevant. You should keep track of the lifecycle of actors you register but this is a good failsafe to prevent crashing
AActor* actor = RelevantActors[i];
if (!ensureAlways(IsValid(actor)))
{
RelevantActors.Remove(actor);
continue;
}
// If the actor is hidden we don't want to show it (but you can change that for example if you want a ghost to interact with the scene)
if (actor->IsHidden()) continue;
// Grab the world location of the actor
const FVector2D actorWorldLocation(actor->GetActorLocation());
// Get the delta between camera center and actor
const FVector2D delta = actorWorldLocation - centerLocation;
// Out of bounds? Ignore
if (!paintBox.IsInside(delta)) continue;
// Calculate paint position from the delta
const FVector2D paintPosition = halfFrameSize + delta * invertedAreaPixelSize;
// Get the bounds of the actor
// If you're using a character it's probably a good idea to use capsule width
FVector origin, bounds;
actor->GetActorBounds(true, origin, bounds);
// Calculate the paint size required to cover the bounds of the actor
const FVector2D paintBounds = FVector2D(bounds) * invertedAreaPixelSize;
// Draw your material to the current render target
canvas->K2_DrawMaterial(DrawMaterial, paintPosition, paintBounds, FVector2D(0.f), FVector2D(1.f));
}
UKismetRenderingLibrary::EndDrawCanvasToRenderTarget(this, context);
static const FName OffsetName = "Offset";
static const FName SizeName = "Size";
static const FName LocationName = "Location";
// Calculate our offset
const FVector2D offset = LastCameraLocation - centerLocation;
// Set the offset and size onto the render target material
RenderTargetMemoryMaterial->SetVectorParameterValue(OffsetName, FVector(offset.X, offset.Y, 0.f));
RenderTargetMemoryMaterial->SetScalarParameterValue(SizeName, PaintArea.X);
// Set parameter collection values for use in your foliage, water, snow, etc.
UKismetMaterialLibrary::SetVectorParameterValue(this, ParameterCollection, LocationName, FLinearColor(centerLocation.X, centerLocation.Y, 0.f));
UKismetMaterialLibrary::SetScalarParameterValue(this, ParameterCollection, SizeName, PaintArea.X);
UKismetRenderingLibrary::DrawMaterialToRenderTarget(this, RenderTargetMemory, RenderTargetMemoryMaterial);
LastCameraLocation = centerLocation;
}
TStatId UWorldInteractionSubsystem::GetStatId() const
{
return GetStatID();
}